Welcome to the UK Window Cleaning Forums

Starting or own a window cleaning business? We're a network of window cleaners sharing advice, tips & experience. Rounds for sale & more. Join us today!

Tank position?

WCF

Help Support WCF:

Luke Barnard

Well-known member
Messages
195
Location
Yggggv
I've just received a 500L upright tank from Wydale to replace my 350L flat tank and I'm planning to fabricate a frame similar to the Pure Freedom version and bolt it into the chassis.

The van is a 2008 Nissan Primastar short wheel base and my question is how far from the bulkhead to mount the tank in order to get the weight distribution rite?

If anybody's got one of these is a Primastar, vivaro or Traffic I'd really appreciate if you could measure the gap between the bulkhead and front of tank and give me a shout.

Cheers.....

 
10923498_1523085941286734_5911204268426076136_n.jpg
ive got a lwb vivaro with a 500l uprite tank i think up againsted the bulk head is good as u can bolt tank fraim to that as well as the flore
 
I've just received a 500L upright tank from Wydale to replace my 350L flat tank and I'm planning to fabricate a frame similar to the Pure Freedom version and bolt it into the chassis.The van is a 2008 Nissan Primastar short wheel base and my question is how far from the bulkhead to mount the tank in order to get the weight distribution rite?

If anybody's got one of these is a Primastar, vivaro or Traffic I'd really appreciate if you could measure the gap between the bulkhead and front of tank and give me a shout.

Cheers.....

PureFreedom put a 650 liter tank up against the bulkhead (across the van) in a couple of swb Vivaro's I've seen, so you should be OK with a 500 liter tank there. ( Leave a small gap as you don't want the fabricated frame rubbing on the bulkhead.) I would put it there, fill it with water and secure it as best you can and get it weighed on a weighbridge to confirm that the front axle isn't overloaded.

Truckers buy software programs that calculate their load positions. I occasionally follow a truckers blog in the US and although they use this calculator every time they load, they always double check that their axles aren't overloaded on a weigh bridge to make sure. Its a rough guide.

Here is a simple formula to roughly calculate where the load you are carrying should be distributed. You will find a list of laden and unladen axle weights on a plate somewhere in the van - try inside driver's door or inside the engine bay.

Add together the kerbside weight + the weight of the driver....

Then subtract that from the stated gross weight on the plate, which gives you the weight that you're allowed to load (payload.)

Then you have to be careful not to overload any individual axle.

The individual axle weights are also given on the plate.

Here's how to calculate the individual axle weights for a 2-axle rigid:

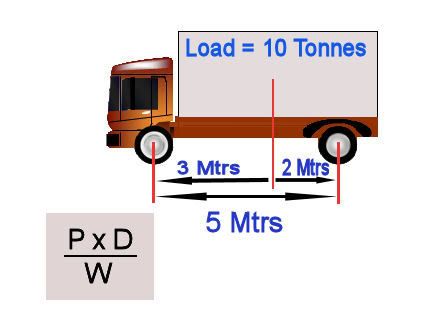
weightdistribution.jpg


In this example, the kerbside weight including the driver is 8 Tonnes.

The load is 10 Tonnes, which in this case is evenly distributed, and the vehicle's GVW is given on the plate as 18 Tonnes.

We now need to measure the distance between the centres of the axles to find the wheelbase, and found this to be 5 Mtrs as in the picture.

We now measure the distance from the centre of the load to each axle and found that in this case it is 3 Mtrs to the front axle and 2 Mtrs to the rear axle as in the picture.

Next, we use the formula in the picture, where

P = payload,

D = distance

and W = wheelbase.

So now to the calculation:

10 x 2 = 20 divided by 5 = 4 Therefore the front axle weighs 4 Tonnes and the rear axle must weigh 6 Tonnes.

NOTE: It doesn't matter which of the 2 "distances" you use, but you should remember that the answer that you get will be for the "other" axle.
icon_wink.gif


Doing the same calculation using the "other" distance will give you:

10 x 3 = 30 divided by 5 = 6 Therefore the rear axle weighs 6 Tonnes and the front axle must weigh 4 Tonnes.

 
Last edited by a moderator:
I have just transferred my pure freedom frame (650 ltr) from a transit to my newer swb citroen relay. It was a major pain drilling into the chassis and used 4 drill bits and several layers of knuckle skin! Don't do it on the drive like I did try get a ramp. You ll need a several 6 or 8 inch bolts. Drill from bottom up to get alingment. Good luck!!

 
Tank frame nearly finished.....what do you think? Any advice or anything I've missed?
It looks good. The welding looks very professional as well.

Have you considered where to mount your pump and controller. I have the pumps on a board on the side of the tank. I throw an old duvet over the whole tank. Although I have a frost stat heater in the van in winter, a tank full of water at 8 or 9 degrees will stop the pumps from freezing up overnight.

What size angle iron did you use? It looks like the base is different from the rest.

 
10923498_1523085941286734_5911204268426076136_n.jpg
ive got a lwb vivaro with a 500l uprite tank i think up againsted the bulk head is good as u can bolt tank fraim to that as well as the flore

Ive got a 1000L that way in a LWB Trafic

 
It looks good. The welding looks very professional as well.
Have you considered where to mount your pump and controller. I have the pumps on a board on the side of the tank. I throw an old duvet over the whole tank. Although I have a frost stat heater in the van in winter, a tank full of water at 8 or 9 degrees will stop the pumps from freezing up overnight.

What size angle iron did you use? It looks like the base is different from the rest.
Yeah it's surprising what you can do with an old mig welder, saved me a fortune on some of the cars I've owned!!!

If you look at the second picture there are two parallel bars at the base of the frame which I'll tap to bolt the pump and di vessel to, not decided about the leisure battery yet but I like the controller next to the hose reel at the rear doors so thats staying put.

Mounting wise it looks like you can safely mount anywhere between the bulkhead and accross the rear axel so I've gone for about 2ft back from the bulkhead which puts the rear of the tank inline with the front of the rear wheel and conveniently over both chassis rails and two crossmembers which means I can attach it with 14 m10 bolts which all go through the chassis! So its going nowhere!!!

I've used 50mm angle iron with 3mm gauge for most of it and the tube is 25mm 3mm gauge, my total parcel weight from the Metal Shop was 46kg!!!

Probably massive over engineering but my kids ride in my van all the time so I'd rather it be safe.

 
Yeah it's surprising what you can do with an old mig welder, saved me a fortune on some of the cars I've owned!!!If you look at the second picture there are two parallel bars at the base of the frame which I'll tap to bolt the pump and di vessel to, not decided about the leisure battery yet but I like the controller next to the hose reel at the rear doors so thats staying put.

Mounting wise it looks like you can safely mount anywhere between the bulkhead and accross the rear axel so I've gone for about 2ft back from the bulkhead which puts the rear of the tank inline with the front of the rear wheel and conveniently over both chassis rails and two crossmembers which means I can attach it with 14 m10 bolts which all go through the chassis! So its going nowhere!!!

I've used 50mm angle iron with 3mm gauge for most of it and the tube is 25mm 3mm gauge, my total parcel weight from the Metal Shop was 46kg!!!

Probably massive over engineering but my kids ride in my van all the time so I'd rather it be safe.

Looks as though you have it all covered. Well done!

I bought a mig welder 20 years ago but just couldn't get the hang of it. A bit stupid really as I have used a stick welder for close on 30 years.

 
Last edited by a moderator:
Looks as though you have it all covered. Well done!
I bought a mig welder 20 years ago but just couldn't get the hang of it. A bit stupid really as I have used a stick welder for close on 30 years.
Snapped my 10mm drill bit (hard to believe) so once I have another I can drill the last of the mounts, paint it and bolt it in, job done.....

Never done stick arc or tig welding but with mig I find if you set the amps based on the material thickness, use argon-co2 mix gas, start with a high wire feed speed and on a piece of scrap the same as you intend to weld bring the speed down untill you get the sizzling bacon sound, thats the machine setup then the weld is just a series of tight arcs or small loops along the length of your joint.

To start with you can easily get p##sed off with the torch popping and spitting and the bird s##t welds produced but get that out of the way on scrap metal and find the machines sweet spot then you can produce some nice looking (and more importantly strong) welds.

Oh and make sure the metal to be joined is ground clean on both sides so you dont draw impurities into the weld.

 
Hi Luke

Sorry but another question please.

How did you fix the angle iron used for the corners to the base and top frame? In other words, does the angle vertical support stop at the top of the horizontal angle iron used on the base and top frame or have you carried it on behind the frames? Carrying it down behind the base and top frame would add more strength as there is more metal to weld together, but I can't see from the photos.

Thanks.

 
Hi LukeSorry but another question please.

How did you fix the angle iron used for the corners to the base and top frame? In other words, does the angle vertical support stop at the top of the horizontal angle iron used on the base and top frame or have you carried it on behind the frames? Carrying it down behind the base and top frame would add more strength as there is more metal to weld together, but I can't see from the photos.

Thanks.
Basically yes the upright pieces are the full hieght of the tank and sit inside overlapping the top and bottom frames, they're welded all the way round then I've ground off the outside corner at 45° and welded through the frames penetrateing into the uprights giving about 350mm of weld on each corner as apposed to about 100mm if you were to just but the uprights to the top and bottom frames.

Also the box section helps knit the top and bottom frames together.

I've pretty much copied the Pure freedom asside from their bottom frame joints are 90° not 45°.

 
In all honesty if I didn't quite enjoy making things like this I would just buy one....a Pure Freedom tank is just over £400, stainless steel and most likely to hold its value well....mines cost about £100 in materials, two days of my time, is mild steel and when I come to sell it's just a homemade frame!

Just a bit of hindsight...

 
Basically yes the upright pieces are the full hieght of the tank and sit inside overlapping the top and bottom frames, they're welded all the way round then I've ground off the outside corner at 45° and welded through the frames penetrateing into the uprights giving about 350mm of weld on each corner as apposed to about 100mm if you were to just but the uprights to the top and bottom frames.Also the box section helps knit the top and bottom frames together.

I've pretty much copied the Pure freedom asside from their bottom frame joints are 90° not 45°.
Thanks again for you advice.

 
In all honesty if I didn't quite enjoy making things like this I would just buy one....a Pure Freedom tank is just over £400, stainless steel and most likely to hold its value well....mines cost about £100 in materials, two days of my time, is mild steel and when I come to sell it's just a homemade frame!Just a bit of hindsight...
so true luke,but i am enjoying looking at this thread as i am about to transfer a pf stystem into a vivaro over xmas,so any tips are welcome mate-did you have to drop the fuel tank?,and any pics are welcome so i could get an idea

 
so true luke,but i am enjoying looking at this thread as i am about to transfer a pf stystem into a vivaro over xmas,so any tips are welcome mate-did you have to drop the fuel tank?,and any pics are welcome so i could get an idea
I recon you'll have yours done before me, kids are off school now so I doubt I'll be allowed to "play with my van" until the new year.

Looks like the fuel tank will need to drop down at least a bit but should be fairly straight forward.

 
I recon you'll have yours done before me, kids are off school now so I doubt I'll be allowed to "play with my van" until the new year.Looks like the fuel tank will need to drop down at least a bit but should be fairly straight forward.
we'll see in the next few days mate i might even take some piccies!

 
started mine today luke,your tank seems to have a smaller footprint?,i was given the exact place to put the tank and bolt lenghts etc but sadly that was for an ionics tank,i had to offset my tank as its a 650l and needed to bolt to the chassis members aswell as the floor,

 
Back
Top